Thinking about keeping an eye on things from afar, maybe with some small devices? You're in a good spot. Lots of folks are curious about how to connect tiny computers to the internet and check on them without being right there. It's a way to get information from places that might be far away, or just hard to get to often. This kind of setup can make a big difference for many different projects, giving you a better picture of what's happening.
It turns out, getting these little setups working from a distance doesn't have to be a big headache, you know? There are some pretty straightforward ways to do it, using tools that are quite common and, very often, won't cost you anything extra. We're talking about putting together something that lets you watch over your little gadgets, collect their data, and even make changes to them, all from your comfy chair. This is actually a pretty neat trick for anyone wanting to get started with home automation or just checking on things remotely.
So, we'll be looking at how you can use a small computer, like a Raspberry Pi, along with some open-source software, to set up your own remote watching system. It's about giving you the ability to connect to your devices, get information from them, and even send instructions, all through a secure link. This approach is rather practical for many situations where you might need to keep tabs on something without always being physically present, and it's quite accessible for someone just getting started with this kind of work.
Table of Contents
- What is Remote IoT Monitoring All About?
- Why Use a Raspberry Pi for Your Remote IoT Monitoring Needs?
- How Does SSH Help with Remote IoT Monitoring Access?
- Where Can You Find the Ubuntu Software for Remote IoT Monitoring?
- Getting Your Raspberry Pi Ready for Remote IoT Monitoring
- Connecting to Your Remote IoT Monitoring Device with SSH
- Common Things You Can Do with Remote IoT Monitoring
- Keeping Your Remote IoT Monitoring Setup Safe and Sound
What is Remote IoT Monitoring All About?
Remote IoT monitoring, in a way, is just what it sounds like. It's about keeping an eye on things that are connected to the internet, but from a distance. Think of tiny sensors in your garden telling you about the soil, or a little camera watching your pet while you're out. These small devices, often called "things" in the Internet of Things (IoT), send their information over the internet. You then get to see that information, perhaps on your phone or computer, without needing to be right there with the device. This kind of setup makes it pretty simple to gather data from places you can't always visit, like a remote weather station or a water level sensor in a far-off tank, so it's quite useful.
The main idea behind this is to collect data, like temperature readings, how much light there is, or if something is moving. That information then travels to you, giving you a picture of what's going on. It means you can react quickly if something changes, or just keep a long-term record of things. For instance, if you have a sensor checking the temperature in a greenhouse, you can get an alert if it gets too cold, even if you're not home. This ability to get updates from anywhere is, quite frankly, a big part of what makes IoT so interesting for many people, especially for remote IoT monitoring.
This whole system helps you make smart choices based on real-time information. It's not just about seeing what's happening; it's about being able to react to it, too. You could, for example, have a system that turns on a pump when the soil gets too dry, or adjusts the lights when it gets dark. The beauty of remote IoT monitoring is that it puts you in charge, even when you're far away. It's a very practical way to stay connected to your devices and the places they are watching over, making things a little bit easier in your day-to-day.
Why Use a Raspberry Pi for Your Remote IoT Monitoring Needs?
The Raspberry Pi is, honestly, a very popular choice for many small computer projects, and it's particularly good for remote IoT monitoring. It's a tiny, credit-card-sized computer that can do a surprising amount of work. One big reason people pick it is its size; it can fit almost anywhere. Another reason is its cost; it's quite affordable, which means you can get started without spending a lot of money. This makes it very accessible for hobbyists and even for bigger projects where you might need many devices.
Beyond its size and price, the Raspberry Pi is also quite flexible. It has many little connection points, called "GPIO pins," that let you hook up all sorts of sensors and other electronic parts. So, whether you want to measure temperature, humidity, light, or something else, the Pi can usually connect to the right sensor. This adaptability is, in some respects, a major benefit, allowing you to build exactly the kind of remote IoT monitoring system you need, without being limited by the hardware.
Moreover, there's a huge community of people who use Raspberry Pis. This means if you ever get stuck or have a question, there are lots of online forums and guides to help you out. You can find ready-made code examples and advice from others who have built similar things. This support system is, basically, invaluable for anyone new to this kind of work, making the learning process a little bit smoother. So, for setting up remote IoT monitoring, the Raspberry Pi offers a great mix of affordability, capability, and community backing.
How Does SSH Help with Remote IoT Monitoring Access?
SSH, which stands for Secure Shell, is a way to connect to another computer over a network in a very safe manner. Think of it like a secret, locked tunnel between your computer and your Raspberry Pi. When you're doing remote IoT monitoring, you want to be sure that no one else can listen in on your connection or mess with your devices. SSH provides that security, which is pretty important when you're sending commands or getting sensitive information.
Using SSH means you can type commands on your own computer, and those commands will actually run on your Raspberry Pi, even if it's in another room, another building, or even another country. It's like having a keyboard and screen directly connected to the Pi, but without needing to be physically there. This is, you know, incredibly handy for managing your remote IoT monitoring setup. You can start programs, stop them, check on files, or even update the software on your Pi, all from a distance.
The way SSH works is that it scrambles all the information that goes back and forth, so it's very hard for anyone else to understand it. It also checks to make sure that the computer you're connecting to is really the one you think it is, and that you are who you say you are. This makes it a very reliable tool for remote access. So, for anyone setting up remote IoT monitoring, learning how to use SSH is, quite literally, a key step to keeping things secure and under your control.
Where Can You Find the Ubuntu Software for Remote IoT Monitoring?
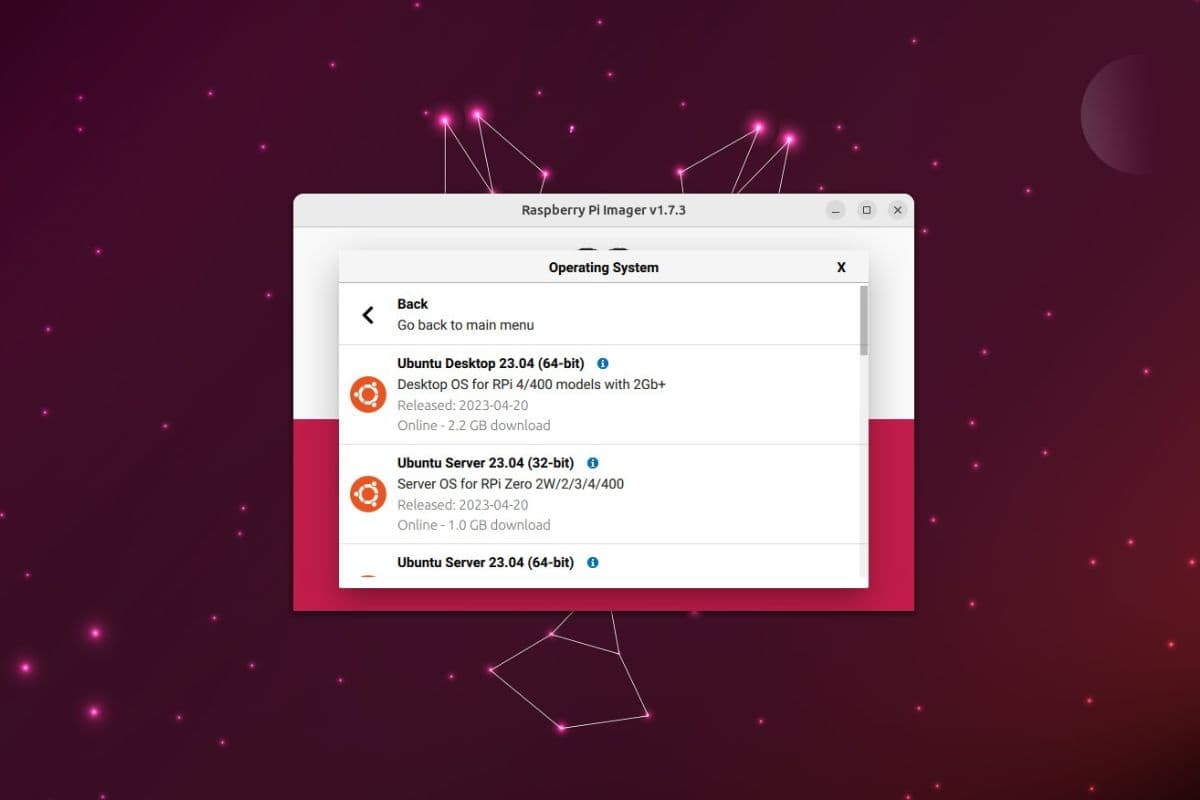
Ubuntu is a type of operating system, much like Windows or macOS, but it's free to use and very popular with developers and people who work with small computers like the Raspberry Pi. For remote IoT monitoring, Ubuntu offers a stable and well-supported platform to run your programs and manage your devices. You can find special versions of Ubuntu that are made specifically for the Raspberry Pi, which makes getting it set up a little bit easier.
The main place to get Ubuntu for your Raspberry Pi is from the official Ubuntu website. They have specific downloads for different Raspberry Pi models. You'll usually download an "image" file, which is like a complete copy of the operating system ready to be put onto a memory card for your Pi. This process is, basically, straightforward, and there are many guides available online to walk you through it step-by-step. It's a free download, too, which helps keep your remote IoT monitoring project budget-friendly.
Once you have Ubuntu on your Raspberry Pi, you get access to a whole world of free software tools. Ubuntu has a very good system for adding new programs, and many of the tools you might need for remote IoT monitoring, like programming languages or specific sensor libraries, are readily available. This means you won't have to search far and wide for the software you need to get your sensors talking and your data flowing. It's a very helpful environment for building out your remote IoT monitoring system.
Getting Your Raspberry Pi Ready for Remote IoT Monitoring
To get your Raspberry Pi ready for remote IoT monitoring, the first thing you'll want to do is put the Ubuntu operating system onto a small memory card. This memory card acts like the hard drive for your Pi. You'll need a computer to do this part, and a special tool that helps you copy the Ubuntu image file onto the card correctly. There are several free tools available for this, and they usually make the process pretty simple, so you won't have too much trouble here.
After Ubuntu is on the memory card, you just pop the card into your Raspberry Pi. Then, you'll need to connect the Pi to power and, at least for the first time, to a screen, keyboard, and mouse. This is just to get it set up and connected to your home network. You'll want to make sure it can access the internet, which is, you know, pretty important for remote IoT monitoring. It's a quick setup process that gets your little computer online and ready to go.
Once your Raspberry Pi is running Ubuntu and connected to your network, you'll want to make sure SSH is turned on. Sometimes it's on by default, but if not, it's a simple command to enable it. This step is very important because it's how you'll connect to your Pi from another computer without needing a screen or keyboard attached to the Pi itself. This way, your remote IoT monitoring device can sit quietly in its spot, doing its job, while you manage it from somewhere else, which is really quite convenient.
Connecting to Your Remote IoT Monitoring Device with SSH
Once your Raspberry Pi is set up with Ubuntu and SSH is enabled, connecting to it from another computer is, actually, pretty straightforward. You'll use a program on your computer that knows how to speak SSH. If you're using a computer with Windows, you might use a program called PuTTY. If you're on a Mac or a Linux computer, SSH is usually built right into the "Terminal" application, which is very handy.
To connect, you'll need to know the network address of your Raspberry Pi. This is like its phone number on your home network. You can usually find this by logging into your Wi-Fi router's settings, or by running a simple command on the Pi itself when you first set it up. Once you have that address, you just type a command into your SSH program, something like `ssh username@raspberrypi_address`, and then you'll be asked for a password. After that, you're in, you know?
Being connected via SSH means you can do almost anything you could do if you were sitting right in front of your Raspberry Pi. You can run scripts to read sensor data, start a program that sends data to a cloud service, or even update the operating system. This ability to fully control your remote IoT monitoring device from anywhere is, in some respects, what makes this whole setup so powerful. It gives you a lot of freedom to manage your projects without constant physical presence.
Common Things You Can Do with Remote IoT Monitoring
With a remote IoT monitoring setup using a Raspberry Pi, Ubuntu, and SSH, you can do many different things. One common use is home automation. You could have sensors checking the temperature in different rooms and then use that information to control your heating or cooling system. Or, you might have light sensors that automatically turn lights on or off based on how bright it is outside. It's a very flexible system for making your home a bit smarter.
Another popular idea is environmental monitoring. You could set up your Raspberry Pi with sensors to measure air quality, humidity, or even the amount of rain. This is useful for gardeners, farmers, or just anyone curious about their local environment. The data can be collected over time, giving you a detailed picture of changes. This kind of remote IoT monitoring can provide, you know, really valuable insights into the world around you, especially if you have a specific interest in weather or climate.
People also use these setups for security or surveillance. You could connect a small camera to your Raspberry Pi and set it up to send you pictures or video if it detects movement. Or, you might have door and window sensors that alert you if they are opened. This gives you peace of mind, knowing you can check on things even when you're away. So, remote IoT monitoring is, basically, a great way to keep an eye on things, whether it's for convenience, information, or safety, and it's quite adaptable.
Keeping Your Remote IoT Monitoring Setup Safe and Sound
Making sure your remote IoT monitoring setup is safe is, actually, pretty important. Since you're connecting to your Raspberry Pi over the internet, you want to protect it from unwanted access. One of the first things to do is change the default password for your Pi. Many devices come with a standard password, and leaving it as is makes it too easy for others to guess. Picking a strong, unique password is, basically, a very good first step.
Another good practice is to keep your Ubuntu software updated. Software updates often include fixes for security issues, so installing them regularly helps protect your system from known weaknesses. It's a simple process to update Ubuntu using SSH, and it helps keep your remote IoT monitoring system running smoothly and securely. This is, you know, something you should do every so often, just to be sure.
You might also think about setting up a firewall on your Raspberry Pi. A firewall acts like a guard, controlling what kind of network traffic can come in and go out of your device. This can help block connections from people or programs you don't want accessing your Pi. While SSH itself is secure, adding a firewall provides an extra layer of protection for your remote IoT monitoring system, giving you, in some respects, more peace of mind about your setup.
Related Resources:


Detail Author:
- Name : Dr. Katarina Douglas
- Username : susie.botsford
- Email : milo.spinka@hotmail.com
- Birthdate : 1983-07-22
- Address : 49996 Teagan Path Apt. 783 South Audreanne, AK 87700
- Phone : 1-804-404-2313
- Company : Paucek-Hamill
- Job : Economist
- Bio : Nisi iste nisi impedit consequatur quas non. Quibusdam laboriosam maiores omnis vero voluptatem natus. Ipsum placeat quis ut esse pariatur dolorem. Ut quia ea quis.
Socials
instagram:
- url : https://instagram.com/ray.bauch
- username : ray.bauch
- bio : Non velit quia necessitatibus similique. Odio ea qui saepe laudantium reprehenderit.
- followers : 3004
- following : 546
linkedin:
- url : https://linkedin.com/in/ray.bauch
- username : ray.bauch
- bio : Quis est animi sit corrupti veniam fugit magni.
- followers : 5822
- following : 2258
